Labels

Bollywood (283) Education (162) General News (21) Technology (120) Top 10 (206)
Showing posts with label Technology. Show all posts

Sunday, 21 August 2016

How to Delete the Windows.old folder from Windows 10


Most of the people upgraded their operating system from Windows 7, 8 and 8.1 to Windows 10. Microsoft has released it's Windows 10 and many people upgraded their PCs and laptops. But what about the previous system where it is? It is saved in your computer itself. It is so because the system don't delete the previous operating systems till approx one month, it does so for you that if in any case you want to revert then you can do it very easily. You can go with your previous Windows through this backup. This all backup is saved in a file in C drive. The backup is saved in a folder named as Windows.old. In this folder you can see all the files of your previously installed operating system. It is for your convenience only. But in this article we will tell you how to delete Windows.old folder


If you are happy with this new Windows and don't want to revert then you can delete this folder because it contains almost 15 to 16 GB of space. You can free up this space by deleting this folder. But you cannot delete it like other files because system won't let you delete Windows.old folder in Windows 10 or other Windows, you will need system permission for that. You will learn how to delete this folder in the steps given below. Just give it a read. 

How to delete Windows.old from Windows 10 :- 

Step 1 - Search for "free up disk space" in the search box given below in Windows 10. 


Step 2 - Click on the first match showing in the image below. 


Step 3 - Check if your Windows disk is set to (C:) or not, if yes click OK.


Step 4 - Click on "Clean up system files" without changing anything. 


Step 5 - Click OK again. 


Step 6 - Find and mark "Previous Windows installation(s)" and Click OK again. 


Step 7 - A prompt will appear, click on "Delete Files" option. 


Step 8 - It will ask you to confirm, click Yes (don't worry nothing will happen to your system)


Wait because it will take some time to delete that folder. 


This is the way to remove Windows.old properly from computer. After this you can see that in C drive there is no Windows.old folder anymore. Your 15 to 16 GB space will recover. But delete that folder only if don't want to revert because there is complete backup in this folder of your previous operating system and if you delete it once you cannot revert easily. 
You can also watch this video to do this step by step :- 


Try this method and let us know if this method worked for you or not by commenting below.

How to Unblock Yourself from other's WhatsApp


WhatsApp is a great messaging app. It's very useful to everyone but here is one option that is most hated option in it. Yes! you reached it, Block! Block option is the most hated option in WhatsApp. Most of the people don't like this option because they get blocked by many people. Once me too got blocked by one of my friend, I was annoying him and he blocked me. This is one of the worst feeling that you can't even abuse him/her, hahahhaha! It was a joke but if you too are blocked by someone and want to know how to unblock yourself on whatsapp then you can get unblocked today by following some simple steps. For this you have to just read this article and do whatever it suggest. 

But the first thing you should do is that you should verify that weather you are blocked in reality or not. For this you need to follow some suggestions which are :

  • Check the profile picture, last seen and status of that person who blocked you, if you cannot see his/her status, profile picture and last seen then it is possible that you are blocked. 

  • Check that your messages which you sent him/her contains one tick mark or two. I mean if it shows only one tick mark then it means your messages have been sent but not delivered from the other side. Then it is possible then you are blocked.


These are two things which you should verify before doing anything. Now if you want yourself unblocked then there is a method to do so, you can get unblocked by deleting your WhatsApp Account but before doing this let's have a look on the WhatsApp Policy that what will happen if you delete your WhatsApp account. WhatsApp will - 

  1. Delete your all account information like proflie picture and status
  2. Delete you from all WhatsApp groups
  3. Delete your message history or all conversation
This will happen to your WhatsApp account if you delete it and if you are agree with these conditions then have a look on the steps to unblock yourself from someone's WhatsApp account.

How to Unblock Yourself from other's WhatsApp :- 

Follow the steps given below. 

Step 1 - Open your WhatsApp Application in your mobile phone.

Step 2 - Go to Settings

Step 3 - Click on Account option

Step 4 - Now select "Delete My Account" option


Step 5 - Enter your mobile number in the given field and hit "DELETE MY ACCOUNT" (don't worry you can use it again)

Step 6 - After deleting your account uninstall WhatsApp completely. 


Step 7 - Reboot your phone. 

Step 8 - Download and install the latest version of WhatsApp from Google Play Store. 


Step 9 - Enter the mobile number and click OK.


You are done !! These are the steps to unblock yourself from any WhatsApp account. Now you can see all the information of that contact again. Send him/her messages again but this time be careful, don't get blocked this time again. 
If you love the article give us your opinion in the comment box below.

How to use WhatsApp on your Computer


You all know that WhatsApp is a messaging app. There is almost 1 Billion users of WhatsApp across the world. In today's world we use these type of messaging apps to make our work easy. We can communicate with each other through this. We can send multimedia messages through this and also our important documents. In short it is very useful for us. But what if you are working on your laptop and there is someone who is chatting with you on WhatsApp on mobile phone. In that case it becomes difficult to use both the devices at the same time. You cannot concentrate on your work which you are doing on your laptop because you have to answer that person again and again on your phone but today we are going to make your life a little easy because today we are going to tell you how to use WhatsApp on PC. Yes! you read it right, we are going to make your work easy and make you comfortable with chatting and typing too long. 

Most of the person don't know that they can use their WhatsApp on their computer too. It's very simple. If you too don't know how to use WhatsApp on PC then read this article and you will find the way to do so. But firstly you need to know weather you can use it or not because here are some conditions to use any WhatsApp product or app. You should have one of the following device -
  • Android
  • iPhone 8.1+
  • Nokia S60, Nokia S40 EVO
  • BlackBerry and BlackBerry 10
  • Windows Phone 8.0 and 8.1
If you have any one of these then you can use this method. Now let's directly jump to the methods to use your WhatsApp on computer. 

How to use WhatsApp on your Computer :- 

1. Setting up WhatsApp App :- 

It's a great feature in WhatsApp. If you don't know how to set up WhatsApp Web then follow the given steps. 

Step 1 - Open this link on your computer - web.whatsapp.com

You will see a page like this. You can see that the steps to use that feature is given below on the page itself. 


Step 2 - Now open WhatsApp on your phone. 

Step 3 - Go to settings and click on "WhatsApp Web" option. 


After clicking on it, it will ask you to scan a code.

Step 4 - Scan the QR Code displaying on your PC. 

You are done now. You can see all chats on your computer screen now. It is the first method to do that. There is another method which can help you to use WhatsApp on your computer. Have a look on the second method.

2. Setting up WhatsApp's desktop app :- 

This is similar to using WhatsApp Web but in this method you need to download the application first after that you can use it. If you don't know how to set up WhatsApp's desktop app then follow us.

Step 1 - Firstly download the suitable version of this application from this link -whatsapp.com/download

If you use Mac then donwload the Mac version and if you use Windows then download Windows version. 

Step 2 - If you use Mac then unzip the file and move to the Application folder and if you use Windows then run .exe file and follow the prompts. 

Step 3 - After completing the basic steps you will see a QR there, go to Settings of your WhatsApp in mobile phone and select WhatsApp Web. 

Step 4 - Scan the code displaying on PC. 

That's it. You are done. 

These are the two ways to operate WhatsApp through PC but here is one thing that you must take care about that if you use public computer or laptop then don't forget to logout. It won't logout itself, you need to log that out yourself otherwise anyone else can read your private conversation. So take care about it and tell us that weather these methods helped you or not by commenting below.

How to Fix No Internet Access Problem in Windows 10


Most of the Windows users are facing so many problems. We have received so many questions for last few months and today we are going to solve one of your problem. Many windows users who just upgraded their computers from window 7, 8 and 8.1 to Windows 10 are facing many problems in their computer. The problems are like someone's Sound is not working well, someone is facing problem with his screen and some are frustrated with their WiFi connection. They said that their WiFi disconnect itself again and again. It means that they cannot connect to WiFi in windows 10. They did so many things to resolve this error but all in vain. It is a problem with most of the users who upgraded their PC into windows 10. If you too are facing this problem then read the full article to solve your problem. 

The first thing you need to understand that the problem is with your windows or with the WiFi connection. It may be possible that your WiFi is not working properly. Contact your internet service provider to know this. The second thing you can do is you can check this test using your mobile. If this same thing happens to your phone then it's the problem of your WiFi connection not the windows. 
But you find no problem like this in your phone then it may be the problem with your Windows 10. In this problem you face no internet access WiFi in windows 10. In that case let's solve your problem by many different ways. 

How to Fix No Internet Access Problem in Windows 10 :- 

1. Update Network Adapter Drivers :- 

This problem may be occur due to drivers. It is possible that when you updated your operating system in windows 10. the drivers that were installed before could not update. Then in that case we can solve this problem by manually updating the drives and to do this just follow the steps - 

Step 1 - Search for "device manager" in the search box. 

Step 2 - Click on the 1st option showing the image below. 
 

Step 3 - Click on "Network Adapters"

Here you can see the full list of drivers of your WiFi which are problem of your WiFi connection. 


Step 4 - Right click on your WiFi driver and click on "Update Driver Software"


Step 5 - Select the first option showing in the image. 


Step 6 - After selecting it follow the steps and close it. 

Now restart your computer and check again. If the problem still not solved then move on the next method. 

2. Enter the Command :- 

You can enter a command. This is very helpful. Give it a try. 

Step 1 - Right click on the Windows button on the left corner. 

Step 2 - Select "Command Prompt (Admin)" option
 

You will look like a screen like this. 


Step 3 - Enter the following command and hit enter - 

netsh int tcp set heuristics disabled

Step 4 - Again enter the following command and hit enter - 

netsh int tcp set global autotuninglevel=disabled

Step 5 - Enter the third command and hit enter again - 

netsh int tcp set global rss=enabled

After you will enter these 3 commands it will look like this. 


Step 6 - Enter the last following command to check all are disabled except one

netsh int tcp show global


Step 7 - Now restart your PC and check your WiFi connection again 

By these two steps you can solve your no internet access in Windows 10 problem. But in case these two methods too won't work for you then try this next method.

3. Run the Network Troubleshooter :- 

Network troubleshooter can help you out from this problem. This is a common method but effective. It will diagnose the problems and fix them automatically. For this you need to follow the steps only. 

Step 1 - Search for "Network Troubleshooter" in the search box. 

Step 2 - Click on the first match - “Identify and repair network problems”

Step 3 - Follow the instructions and close it. 

Now you can see if there is some problem with your system or not. It will guide you till the end. These are the methods to solve your no WiFi connection problem. If these methods helped you then do let us know by commenting below and tell us which one helped you.

How to Download Youtube Videos on Computer


YouTube is all about videos. If anyone wants to see any kind of video then he goes to YouTube directly and watches it. A large number of people watch videos everyday. If you go to YouTube and watch any video and want to download it but you don't know how to download videos from YouTube then what ? In that case we are here to tell you the methods or tricks to download any video from YouTube. Many people watches videos everyday on YouTube but they don't download anyone because they don't know how to do that. Today we are going to tell you the ticks to download YouTube videos. If you too want to download any video from YouTube then this article is only for you.
YouTube is designed only to watch videos not to download them but there are many tricks or methods by which you can download them. Just read the articles till the last and after reading this you will be able to download any video from YouTube. Now here are some methods just follow these methods -

Ways to Download YouTube Videos :- 

There are so many softwares and sites through which you can do so. Through these sites and softwares you can easily do this task. Some tricks or methods need no any software. See some tricks first which do not require any software. 

Method 1 - 

Just follow the steps - 

Step 1 - Go to YouTube and play that video which you want to download


Step 2 - In the URL of the video add "ss" after www. and hit enter


After hitting enter key you will see a page look like this.


Step 3 - Click on arrow button showing in the image below. This will expand more options for you.


Step 4 - Click any option according to your need and after clicking it your downloading will start. 


These are the steps which you have to follow to download any video from YouTube. This method doesn't need any external software to install. Now let's have a look on the second method. 

Method 2 - 

In this method you can directly visit the site to download your video. Let's jump to the steps directly.  

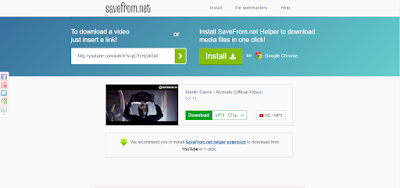
Step 1 – Go to this given link –  http://en.savefrom.net/ . This page will look like this.


Step 2 – Now copy the URL or link of that video which you want to download and paste it in the blank space showing in the image below.


Step 3 – After pasting the link click on arrow button.


After clicking it the page will look like this and you can see the video below which you want to download.


Step 4 – Click on arrow button to expand the options like previous method and choose the quality of the video.


You are done! By following these steps you will be able to download a YouTube Video.
If you don’t like these above methods then here is a third method to do so. In this method you can download the video with the help of a software. Let’s move on to our next way or method directly.

Method 3 –


In this method we will download the YouTube video with the help of free softwares. These software are available on internet. You have to download the software and follow the steps given below. So many free softwares are available so download any one of them. But we recommend you to use Ummy Video Downloader because with the help of this free downloader you can download mp3 version also of that video and now follow the steps

Step 1 - Download Ummy Video Downloader from it's official website, you can go it's website by clicking here.

Step 2 - After download install it and open this downloader, it will look like this. 


Step 3 - Copy the URL of the video which you want to download and paste it into the blank space. 

Now you can see your video with the downloading option here. 


Step 4 - Choose the quality of your video and click download. 

After this you are done.

These are the methods to Download videos from YouTube. If these methods worked for you then do let us know by commenting below and if you know some other methods or ways then tell us.

Thursday, 4 August 2016

Apple iPhone 7 release date in India Confirmed

Apple iPhone 7 is the next big thing by Apple. It is the most awaited iPhone till date. People from all around the world are waiting for the confirmed release date of iPhone 7. However, Apple haven't announced the release date of it's most awaited iPhone but still people are making their guesses about it's release. So many tech Gurus and professionals are waiting for it's release. Their are so many rumors regarding this iPhone 7. This is going to be a great phone by Apple. 


The first model/series of every iPhone comes with lots of updates and the professionals and the fans as well are keeping their eyes on the new updates of new iPhone 7. This iPhone 7 is going to be the first model of 7 series that's why everyone is expecting this with lots of cool updates. Many people specially our Indians are looking for Apple iPhone 7 release date in India and for them we have panned down this article regarding only the release date of new iPhone 7. 


Apple iPhone 7 Release Date :-

There are many rumors for the release date of Apple iPhone 7. Everyone is giving their own views and release date for the iPhone 7. We are expecting that Apple iPhone 7 is going to release in the month of September of this year. We can say that by seeing the pattern of Apple. Apple launched it's iPhone 5c and 5s on 10th September, 2013, later it released new iPhone series iPhone 6 and 6 Plus that too were released on 9th September, 2014. Next year Apple launched iPhone 6s and 6s Plus on 9th September, 2015. So this year it seems that Apple is going to follow it's pattern again and will launch it's newly iPhone 7 in the month of September of this year. Some are saying that Apple will launch iPhone 7 and iPhone 7s together and some says that it will launch it's both the phones on different dates.

There are so many rumors and leaks for the last few months but it is impossible to say which one is correct. All the news sites and blogs are writing about the release date for iPhone 7 but nobody is confirm about it. Some rumors say that Apple is going to launch it's iPhone 7 and iPhone 7s on two different dates if this is right then it must be because of the global competition but on the other hand some rumors say that these two phones are going to launch on the same date if this happens then it means that there are not much difference in the features and updates of both the phones. 
Let's have a look on the month and the years of previously launched iPhones :- 

Model name
Release date
iPhone
June 2007
iPhone 3G
June 2008
iPhone 3G S
June 2009
iPhone 4
June 2010
iPhone 4S
October 2011
iPhone 5
September 2012
iPhone 5S and 5C
September 2013
iPhone 6 and 6 Plus
September 2014
iPhone 6SSeptember 2015
iPhone 7September 2016 (expected)
There are another updates and according to them iPhone 7 is going to release in the 2nd week of this September. 
Evan Blass is a famous mobile reporter in Venturebeat.com. He tweeted two dates one on 23rd July and 2nd on 28th July. According to his first tweet on 23rd July iPhone 7 release date is week of september 12th and according to his 2nd tweet on 28rd July the pre-orders for this iPhone will start from 9th September.

Apple iPhone 7 Launch Date :-


Nobody knows the actual launch date of iPhone 7 and iPhone 7s but Evan Blass gave a fix date of it's announcement. It doesn't matter who says what, the main thing is that we are only 1 month away from the new big thing by Apple. Let us remind you that the price too are not going to cheap or according to your plans as you noticed that every time when Apple launches it's any iPhone the price always hits the sky. So be ready to give a huge amount of money for this iPhone.

Launch date for iPhone 7 will be announced in a press conference by Apple. If you too are a iPhone lover then you must be waiting for this phone. Everyone is excited for this. It will launch with a great design and look. Since Apple is more famous for it's design so the design of iPhone 7 will give you a great happiness. The design is great and rumors say that there will be more updates in it. These iPhone 7 and 7s will be water and dust proof. These are also the cool features in these iPhones. The prices will be different for every different storage variant. 

We are only about a month away from the release of this most awaited iPhone. Everyone is expecting it with lots of new cool features and updates. It is fully compact with all the important features. If both the phones release on the same date then there would be not much difference in the features of both. It's yet covered that whether both are going to launch on the same date or not.